

TRENDING
Painting Tools Checklist
Prep & Application Gear
DIY Painting Kit
Painting Tools Checklist: The Complete Kit for a DIY Home Painting Project
Every DIY painter knows the moment, you're halfway through a wall, roller in hand, and realise you're out of masking tape, or worse, you never had a tray to begin with. A little planning before you open the first tin saves you multiple trips to the store and a fair bit of paint splattered where it shouldn't be. This checklist walks through every tool worth having on hand, from wall putty and sandpaper right through to the final cleanup bucket, so your next paint job goes smoothly from start to finish.
Why a Tool Checklist Saves Time, Money, and Mess

The Cost of Starting Without the Right Tools
Missing tools mid-project usually means paint left open and drying while you dash out for a forgotten roller tray, or worse, improvising with whatever's lying around, which rarely ends well.
How the Right Kit Gives a Professional-Looking Finish
Good prep tools and proper application gear are what separate a smooth, even finish from a patchy one.
The paint matters, but so does everything that touches the wall before and during application.
Surface Preparation Tools

Sandpaper and Sanding Block
Used to smooth rough patches and old paint edges before a fresh coat goes on.
Putty Knife and Scraper
Essential for scraping off old flaking paint and applying wall putty into cracks and dents.
Wall Filler / Putty
Wall putty fills cracks, dents, and uneven patches, giving you a smoother surface for the paint to sit on. A little extra time spent on wall putty application now saves a patchy finish later. If you're budgeting for the project, checking the wall putty price at your local store alongside your paint cost will help you plan the full prep budget, not just the topcoat.
Cleaning Cloth and Sponge
Used to wipe down dusty or dirty surfaces before painting begins, since paint sticks far better to a clean wall.
Wire Brush (for Rust and Flaking Paint)
Handy for scrubbing away rust or stubborn old paint on metal fixtures before repainting.
Primer Paint and Applicator
A coat of wall primer helps fresh paint bond evenly, especially over patched putty or a very different old colour. Wood primer serves the same purpose for wooden surfaces, sealing the grain before the topcoat goes on, and it's worth keeping a small applicator brush aside just for this step. If you're wondering whether it's worth the extra tin, most hardware stores will tell you paint primer for walls costs a fraction of the topcoat itself, and a small spend here usually prevents patchy, uneven colour later.
Protection and Masking Tools

Painter's / Masking Tape
Keeps clean lines along trim, switchboards, and edges, and saves you the trouble of touching up paint where it shouldn't be.
Drop Cloths and Plastic Sheeting
Protects floors and furniture from drips and splatters throughout the project.
Old Newspapers and Rags
Useful for quick cleanups, covering small items, and wiping excess paint off tools as you go.
Paint Application Tools

Paint Brushes (Sizes and Types to Keep Handy)
A mix of small, medium, and large brushes covers everything from detail work to broad strokes.
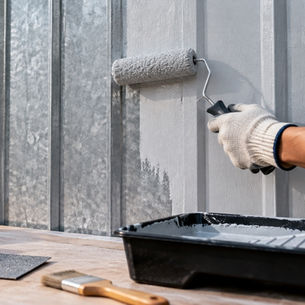
Paint Rollers and Roller Covers
The workhorse of any wall job, paint rollers cover large areas quickly and evenly.
Paint Tray and Liner
Holds paint for rolling and helps you load the roller evenly without overloading it.
Extension Pole for High Walls and Ceilings
Saves you from wobbling on a ladder for every high stroke and helps maintain a steady, even application.
Small Foam Rollers and Detail Brushes
Useful for smaller surfaces, furniture pieces, and areas a full-sized roller simply can't reach.
Tool
What It's For
Must-Have or Optional
Approx. Use
Sandpaper
Smoothing rough patches
Must have
Prep
Putty knife
Applying wall putty, scraping
Must have
Prep
Masking tape
Clean edges and lines
Must have
Masking
Drop cloths
Protecting floors and furniture
Must have
Masking
Paint roller and tray
Covering large wall areas
Must have
Application
Extension pole
Reaching high walls safely
Optional
Application
Small foam roller
Furniture and tight spaces
Optional
Application
Safety and Comfort Gear

Gloves and Safety Goggles
Keep paint and dust off your hands and out of your eyes, especially during sanding and prep work.
Dust Mask or Respirator
Worth wearing during sanding and when working with strong-smelling paints in enclosed rooms.
Step Ladder or Stool
A stable, sturdy step ladder is safer and steadier than balancing on furniture for those higher spots.
Cleanup Tools

Brush and Roller Cleaning Supplies
Keeps your brushes and rollers usable for the next project instead of ending up in the bin after one use.
Bucket and Solvent / Soap Water
Needed for rinsing tools thoroughly, water for emulsion paint, and the right solvent for oil-based or enamel paint.
Storage for Leftover Paint
Airtight containers or well-sealed original tins keep leftover paint usable for touch-ups down the line.
The Complete DIY Painting Tools Checklist
Prep: sandpaper, sanding block, putty knife, wall putty, wall primer, wood primer for wooden surfaces, cleaning cloth, wire brush

Masking: painter's tape, drop cloths, plastic sheeting, old newspapers
Application: brushes in various sizes, rollers and covers, paint tray, extension pole, small foam rollers
Safety: gloves, safety goggles, dust mask, step ladder
Cleanup: cleaning supplies for brushes and rollers, bucket, soap or solvent, storage containers for leftover paint
Tools by Project Type
Single Accent Wall
A brush, a small roller, painter's tape, and a drop cloth cover most of what you'll need for a single wall.
Full Room Repaint
Bring in the full kit, prep tools, masking supplies, a proper roller setup, and an extension pole for ceiling-height walls.

Wood or Metal Furniture Touch-Up
A smaller brush, sandpaper, and a wire brush for any rust are usually enough for furniture-sized projects.
Exterior or Large Surface
A sturdier roller, extension pole, and weather-appropriate paint matter most here, along with a good drop cloth for outdoor surfaces below.
What You Can Skip (and What You Shouldn't)
Skip fancy specialty rollers unless your project genuinely calls for a specific texture
Don't skip painter's tape, clean edges make a huge visual difference
Skip an expensive ladder if a sturdy step stool covers your ceiling height
Don't skip wall putty and primer; they're the difference between a lasting finish and an early touch-up
Skip buying every brush size available; three well-chosen sizes usually cover most projects
Frequently Asked Questions
What is the absolute minimum set of tools I need to paint one room?
A brush, a roller with tray, painter's tape, a drop cloth, and basic prep tools like sandpaper and a putty knife will cover most single-room projects.
Do I really need a paint tray, or can I dip straight from the can?
A tray helps load the roller evenly and avoids overloading it, which leads to drips. It's a small tool that makes a noticeably neater job.
Should I buy a roller or a brush for painting a full wall?
A roller is faster and gives a more even finish across large flat areas, while a brush stays essential for the edges and corners the roller can't reach.
Is painter's tape worth it, or can I just paint carefully around edges?
Painter's tape is worth it for crisp, professional-looking lines, especially around switchboards, trim, and ceiling edges where a steady hand alone isn't always enough.
What grit sandpaper should I keep for prepping interior walls?
A medium grit is usually enough for smoothing minor imperfections before a fresh coat of paint goes on.
Can I reuse roller covers, or are they single-use?
Roller covers can be cleaned and reused a few times if washed thoroughly right after use, though they do wear out eventually with repeated use.
Do I need a primer and primer tools for a simple repaint?
If the existing colour is similar and the wall is in good condition, primer may not be strictly necessary, but it's worth using when covering a very different colour or a patched surface.
What's the best way to clean tools so they last for the next project?
Rinse or clean tools immediately after use rather than letting paint dry on them, reshape brush bristles while damp, and store everything completely dry.
How do I store leftover paint and tools between projects?
Seal paint tightly in its original tin or an airtight container, and store brushes and rollers clean and completely dry to avoid mould or stiffening.
Are budget DIY tool kits good enough, or should I buy tools individually?
Budget kits work well for occasional small projects, but investing in a few better-quality individual tools, especially brushes and rollers, pays off if you paint fairly often.
Get your tools sorted before the first tin opens, and the rest of the project tends to fall into place. A little preparation here goes a long way toward a finish that looks like it was done by someone who knew exactly what they were doing, because, with this checklist, you will.
LIKE THIS ARTICLE
Give us a thumbs up!

TEXTURE FINISH
Royale Play special effects for the interior


Call us for Painting Services
 1800-209-5678
Are you looking for home interiors?
Get tailored made designs from our interior design services by asian paints.
Are you looking for home interiors?
Get tailored made designs from our interior design services by asian paints.
Fill the form below to book an appointment with an in house interior designer.