

Waterproofing
Bathroom waterproofing
Bathroom Leakage Detected? The Most Effective Waterproofing Methods Explained
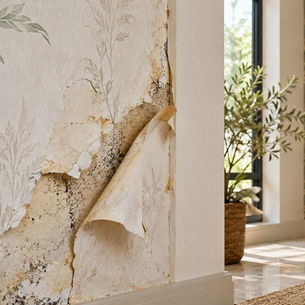
Bathroom leakage is a common household problem that can damage walls, floors, ceilings, and adjoining rooms if left untreated. Damp patches, peeling paint, loose tiles, musty odours, and water stains often indicate an underlying issue that requires attention. Timely repairs and the right waterproofing system can prevent recurring damage and costly renovations.
Understanding the cause of water leakage is the first step towards a lasting solution. Whether the problem originates from damaged plumbing, deteriorated grout, cracked tiles, or a failed waterproofing layer, choosing the right repair method is essential. This guide explains effective bathroom waterproofing methods, repair techniques, product selection, and preventive measures to keep your bathroom dry and protected.
IN THIS ARTICLE
Why Immediate Waterproofing Is Essential After Bathroom Leakage
How to Identify the Source of Bathroom Leakage
What Are the Most Effective Methods for Waterproofing a Bathroom After Leakage Is Detected?
How to Fix Seepage in Bathroom Walls and Floors
How Do I Waterproof My Bathroom Walls Without Breaking the Tiles?
How to Choose the Best Waterproofing Products for Bathroom Walls and Flooring
Which Waterproof Paint Is Best for Damp-Prone Bathrooms and Why?
Step-by-Step Process to Waterproof a Bathroom After Leakage
Common Waterproofing Mistakes That Lead to Repeat Leakage
Why Immediate Waterproofing Is Essential After Bathroom Leakage

Common Causes of Bathroom Leakage and Seepage
Bathroom leakage can occur because of damaged water supply pipes, leaking drainage connections, cracked tiles, deteriorated grout, or gaps around bathroom fixtures. Poorly installed waterproofing membranes and improperly sealed floor-wall junctions can also allow moisture to penetrate the underlying structure.
Risks of Ignoring Dampness and Water Damage
Ignoring water seepage can lead to peeling paint, damaged plaster, loose tiles, mould growth, and deterioration of building materials. Persistent moisture may also damage the ceiling below an upstairs bathroom. Early repairs help minimise structural damage and reduce long-term maintenance expenses.
How Early Waterproofing Prevents Costly Repairs
Promptly identifying the source and applying the appropriate waterproofing system prevents moisture from spreading into surrounding areas. Early intervention can also reduce the need for extensive tile removal, plaster replacement, and repeated repainting.
How to Identify the Source of Bathroom Leakage

Signs of Water Seepage in Bathroom Walls and Floors
Look for damp patches, discoloured walls, bubbling paint, mould, loose tiles, persistent wet spots, or white salt deposits on masonry. Water stains on the ceiling below a bathroom may indicate a leak in the plumbing or floor waterproofing system.
Detecting Pipe Leaks, Grout Failure, and Cracks
Inspect grout lines, silicone sealant around fixtures, pipe connections, shower corners, and visible cracks. A plumber can perform appropriate pressure tests to investigate suspected supply-pipe leaks. Drainage tests and professional moisture assessments can help identify less obvious problems.
When to Call a Waterproofing Expert
Seek professional help when leakage continues despite basic repairs, moisture appears in adjoining rooms, or the source remains unclear. Extensive seepage, damaged waterproofing membranes, and leaks affecting neighbouring properties generally require specialist inspection.
What Are the Most Effective Methods for Waterproofing a Bathroom After Leakage Is Detected?
The most effective waterproofing method depends on the source of the leak, the condition of the existing surfaces, and the severity of the damage.

Cementitious Waterproofing for Bathroom Walls and Floors
Cementitious waterproofing uses cement-based coatings to create a protective barrier on suitable surfaces. It is commonly used beneath tiles in bathrooms, showers, and other wet areas. The substrate must be properly prepared, and the product must be applied according to the manufacturer's instructions.
Liquid Waterproofing Membranes for Leak-Prone Areas
Liquid-applied membranes form a continuous waterproof layer when correctly applied and cured. They are particularly useful around shower areas, floor-wall junctions, and pipe penetrations. Reinforcing tapes or compatible accessories may be required at corners and joints.
Polyurethane Waterproofing for Long-Lasting Protection
Polyurethane membranes can provide flexible, seamless protection when the selected formulation is suitable for the substrate and intended wet-area application. Correct surface preparation, moisture conditions, application thickness, and curing are critical to performance.
Crack Filling and Joint Sealing Solutions
Cracks should be repaired using compatible materials after determining their cause. Flexible sealants are useful around fixtures and movement joints, while suitable repair mortars or injection systems may be needed for other defects. Simply covering a crack without addressing its underlying cause can result in recurring leakage.
How to Fix Seepage in Bathroom Walls and Floors

Identifying the Root Cause of Seepage
Determine whether moisture originates from plumbing, shower splashes, failed grout, external walls, or a damaged waterproofing layer. A professional inspection is particularly valuable when the affected area does not correspond to the visible water source.
Repairing Cracks and Damaged Grout Lines
Remove deteriorated grout where necessary, repair cracks with compatible products, and replace failed sealant around fixtures. If tiles are loose or the underlying membrane has failed, surface-level repairs may not be sufficient.
Waterproofing Damp Bathroom Surfaces
Before applying a waterproofing product, remove loose material and allow the substrate to reach the moisture condition specified by the manufacturer. Apply the selected system at the recommended coverage and thickness, including appropriate reinforcement at vulnerable junctions.
Preventing Seepage From Returning
Restore damaged seals, maintain plumbing connections, ensure proper drainage, and follow the recommended curing period before exposing repaired areas to water. A reliable wall seepage solution addresses the source of moisture rather than merely hiding stains.
How Do I Waterproof My Bathroom Walls Without Breaking the Tiles?

Tile Joint and Grout Sealing Techniques
Regrouting damaged joints and renewing failed silicone seals can help reduce water penetration through defective joints. However, grout is not a substitute for a waterproofing membrane, and these repairs cannot correct a failed layer beneath the tiles.
Applying Transparent Waterproof Coatings Over Tiles
Certain transparent coatings are designed for compatible tiled surfaces and can help reduce water penetration. Check whether the product is suitable for the tile material, grout, and wet-area exposure. Test adhesion and appearance on a small area first.
Injection Grouting for Hidden Leakage Paths
Specialist injection grouting may seal certain cracks or voids without extensive demolition. The appropriate resin or grout depends on the construction material, leak characteristics, and pressure conditions. This technique is not suitable for every bathroom leak.
Benefits and Limitations of No-Break Waterproofing Solutions
No-break solutions can reduce disruption and repair costs when leakage results from defective surface joints or localised cracks. However, if the underlying waterproofing membrane has failed, removing tiles and reinstating the waterproofing system may be the only dependable long-term solution.
How to Choose the Best Waterproofing Products for Bathroom Walls and Flooring

Understanding Different Types of Waterproofing Solutions
Common options include cementitious coatings, liquid-applied membranes, polyurethane systems, crack repair compounds, grout sealers, and flexible joint sealants. Each serves a different purpose, so products should be selected according to the defect and substrate.
Key Features to Look for in Bathroom Waterproofing Products
Choose products designed for wet areas with suitable adhesion, flexibility, water resistance, and compatibility with the intended finish. Check application thickness, coverage, curing time, and whether the product can be used beneath tiles or over existing surfaces.
Selecting Solutions Based on Leakage Severity
Minor grout deterioration may need joint repairs, while plumbing leaks require plumbing work. Extensive seepage or membrane failure may call for a complete waterproofing treatment. Effective waterproofing for bathroom surfaces starts with diagnosis rather than choosing a product based on price alone.
Waterproofing Products for Walls vs Flooring
Bathroom floors require systems compatible with standing water, drainage details, and floor-wall junctions. Shower walls need appropriate protection against repeated water exposure. Always verify that the selected system is approved for the specific surface and application.
Which Waterproof Paint Is Best for Damp-Prone Bathrooms and Why?

Features of High-Performance Waterproof Paints
Look for moisture-resistant paints with good adhesion, washability, and mould resistance where appropriate. The product should be suitable for bathroom interiors and the underlying substrate.
How Waterproof Paint Helps Control Dampness
Suitable paint can protect properly prepared surfaces from humidity, condensation, and routine splashes. However, it cannot stop active plumbing leaks or replace a failed waterproofing membrane.
Paint vs Waterproofing Membranes: Understanding the Difference
Water-resistant paint provides a protective decorative finish, whereas a waterproofing membrane is designed to prevent water penetration through a properly treated surface. Persistent leakage must be repaired before repainting.
Choosing the Right Finish for Long-Term Protection
Select a washable finish suitable for bathroom conditions. Repair damaged plaster, resolve moisture problems, and allow the surface to dry as recommended before painting.
Step-by-Step Process to Waterproof a Bathroom After Leakage

Inspect the area: Identify the source of leakage through visual checks and professional testing where necessary.
Repair damage: Fix faulty pipes, drainage connections, cracks, and failed joints.
Prepare the surface: Remove loose material, dirt, soap residue, and deteriorated coatings.
Apply waterproofing: Use a compatible system following the specified coverage, thickness, and curing requirements.
5. Seal vulnerable points: Treat corners, pipe penetrations, and movement joints with suitable accessories.
6. Conduct a water ponding test: Where appropriate, test the completed floor waterproofing system according to professional guidance and product requirements, after full curing and with suitable precautions.
7. Complete finishing work: Reinstall tiles or apply suitable paint and finishes only after the waterproofing system has passed the required checks.
Common Waterproofing Mistakes That Lead to Repeat Leakage

Waterproofing Without Fixing the Root Cause
Applying a coating over a leaking pipe or defective drain connection will not resolve the underlying problem.
Skipping Surface Preparation Before Application
Dust, loose plaster, oil, and unsuitable moisture conditions can compromise adhesion and waterproofing performance.
Using Incorrect Products for Wet Areas
Ordinary interior paint or an incompatible coating may fail under repeated water exposure. Always select products intended for the specific application.
Ignoring Tile Joints, Corners, and Pipe Penetrations
These vulnerable points need appropriate sealing and reinforcement. Overlooking them can allow water to bypass an otherwise sound waterproofing layer.
Long-Term Tips to Prevent Bathroom Leakage and Seepage

Regular Inspection of Grout and Sealant Lines
Check grout, silicone seals, plumbing connections, and tile condition periodically. Replace deteriorated materials before water penetrates deeper surfaces.
Maintaining Proper Bathroom Ventilation
Use an exhaust fan or adequate ventilation to reduce condensation and humidity. This helps prevent mould and moisture-related paint damage.
Addressing Minor Cracks Before They Worsen
Investigate new cracks, loose tiles, and persistent damp spots promptly. Small visible defects may indicate a more significant underlying issue.
Scheduling Preventive Waterproofing Checks
Inspect wet areas periodically, especially after plumbing repairs or renovation work. Professional checks can help identify developing problems before they cause extensive damage.
Frequently Asked Questions
1. What are the most effective methods for waterproofing a bathroom after leakage is detected?
Cementitious coatings, liquid waterproofing membranes, and suitable polyurethane systems are effective options depending on the substrate and severity of the leak. Repairing the root cause is essential before waterproofing.
2. How do I waterproof my bathroom walls without breaking the tiles?
Repairing grout, renewing silicone seals, applying a compatible transparent coating, or using specialist injection grouting may help in selected cases. Failed underlying membranes may require tile removal.
3. How do I fix seepage in a bathroom?
Identify the moisture source, repair plumbing or surface defects, dry and prepare the affected area, and apply the appropriate waterproofing treatment. Extensive or recurring seepage requires professional assessment.
4. How do I choose the best waterproofing products for bathroom walls and flooring?
Consider the substrate, leakage severity, water exposure, product compatibility, flexibility, and curing requirements. Follow the manufacturer's technical guidance.
5. Which waterproof paint is best for damp-prone bathrooms and why?
Choose a bathroom-grade, washable, moisture-resistant paint suitable for the surface. Resolve active leakage and persistent dampness before painting.
6. Can bathroom leakage be fixed without removing existing tiles?
Sometimes. Surface joint repairs and compatible coatings can help with localised defects, but extensive membrane failure may require tile removal.
7. How long does bathroom waterproofing last after repair?
Its lifespan depends on product quality, installation, substrate condition, water exposure, and maintenance. Correct installation and prompt repairs help maximise durability.
8. What are the signs that my bathroom needs waterproofing again?
Recurring damp patches, peeling paint, mould, loose tiles, deteriorated grout, persistent musty smells, and water stains on adjoining ceilings may indicate a problem that needs investigation.
LIKE THIS ARTICLE
Give us a thumbs up!
TEXTURE FINISH
Royale Play special effects for the interior


Call us for Painting Services
 1800-209-5678
Are you looking for home interiors?
Get tailored made designs from our interior design services by asian paints.
Are you looking for home interiors?
Get tailored made designs from our interior design services by asian paints.
Fill the form below to book an appointment with an in house interior designer.